

Quick summary:
git worktreelets you have multiple working directories linked to the same repository, each on a different branch. That means: nogit stash, no lost context, no cloning the repo multiple times. In this guide, you’ll learn everything about git worktree with practical examples and real use cases.
Introduction: The Problem Every Dev Has Lived Through
You’re in the middle of a complex feature. The code is half-done, tests are failing, and suddenly: “I need an urgent hotfix on main.”
What do you do?
git stasheverything and hope you don’t lose anything?- Clone the whole repo into another folder?
- Commit broken code just to switch branches?
If you’ve been through this, know that there’s a native Git solution few developers are aware of: git worktree. It solves this problem elegantly, quickly, and without workarounds.
In this post, you’ll understand what git worktree is, how it works under the hood, and how to use it day-to-day to boost your productivity.
What Is Git Worktree?
git worktree is a native Git command (available since version 2.5) that lets you create additional working directories (working trees) linked to a single .git repository.
In practice, this means you can have the main branch open in one folder, feature/login in another, and hotfix/bug-123 in a third, all at the same time, with no conflicts and no duplicating the repository.
How Does It Work Under the Hood?
When you run git worktree add, Git:
- Creates a new directory at the path you specified
- Checks out the given branch in that directory
- Shares the same
.git(objects, history, refs) as the original repository - Creates a
.gitfile (not a folder) in the worktree pointing back to the main repository
This is very different from cloning. A clone duplicates everything. A worktree shares everything.
Why Use Git Worktree? 5 Reasons to Adopt It Now
1. No More Panicked git stash
With separate worktrees, you never have to interrupt your work again. Each branch lives in its own directory, with its own modified files.
2. Frictionless Pull Request Reviews
Need to review a colleague’s code? Open their branch’s worktree, run the tests, review the code, all without touching your work in progress.
3. Parallel Testing
Run the production branch’s test suite in one terminal while developing on the feature branch in another. No waiting, no context switching.
4. Better Performance Than Cloning
Since the worktree shares Git objects, it’s much faster and uses much less disk space than cloning the repository.
5. Simultaneous Builds
In .NET, Java, or Node.js projects with heavy builds, you can keep a build running on one branch while editing another.
Hands-On: Git Worktree in Practice
Example 1: Hello World with Worktree
Let’s start from scratch to understand the flow:
# 1. Create a test repository
mkdir my-project && cd my-project
git init
echo "# Hello World" > README.md
git add . && git commit -m "feat: initial commit"

# 2. Create a feature branch
git branch feature/hello

# 3. Create a worktree for that branch
git worktree add ../my-project-feature feature/hello
Now you have two folders:
my-project/→mainbranchmy-project-feature/→feature/hellobranch
Open each folder in a different terminal or IDE and work normally. The changes are independent, but the history is shared.
# In the worktree folder
cd ../my-project-feature
echo "console.log('Hello from worktree!');" > hello.js
git add . && git commit -m "feat: add hello.js"

# Go back to main - your README.md is untouched
cd ../my-project
cat README.md  # "# Hello World"
Example 2: Urgent Hotfix with a To-Do List
Real scenario: you’re developing a to-do list feature and need to fix a production bug.
# You're on the feature/todo-list branch, working...
# The hotfix request comes in. No panic:

# 1. Create a worktree for the hotfix based on main
git worktree add ../hotfix-todo hotfix/fix-delete-bug main

# 2. Go to the hotfix folder and fix it
cd ../hotfix-todo
# ... make the fix ...
git add . && git commit -m "fix: fix deletion of completed tasks"
git push origin hotfix/fix-delete-bug

# 3. Go back to your feature as if nothing happened
cd ../my-project
# Your feature code is exactly where you left it
No stash, no dirty commits, no lost context.
Essential Git Worktree Commands
Here’s your survival kit:
# List all active worktrees
git worktree list

# Create a new worktree with an existing branch
git worktree add <path> <branch>

# Create a new worktree with a new branch (from the current one)
git worktree add -b <new-branch> <path>

# Remove a worktree (after deleting the folder)
git worktree remove <path>

# Clean up references to manually removed worktrees
git worktree prune
Important Tip
Each branch can only exist in one worktree at a time. If main is already checked out in the main worktree, you can’t check it out in another worktree. This is a Git safeguard to prevent conflicts.
Git Worktree vs Alternatives: Comparison Table
| Criteria | git worktree | git stash | git clone |
|---|---|---|---|
| Context switching | None (separate folders) | Total (same folder) | None (separate repo) |
| Disk usage | Low (shares .git) | No extra usage | High (duplicates everything) |
| Creation speed | Instant | Instant | Slow (depends on repo size) |
| Risk of data loss | Zero | Medium (stash can conflict) | Zero |
| Shared history | Yes | N/A | No (until push/pull) |
| Simultaneous work | Yes | No | Yes |
| Complexity | Low | Low | Medium |
git worktree wins in nearly every scenario. git stash is still useful for quick, trivial changes, but for anything taking more than 5 minutes, worktree is superior.
Advanced Tips to Master Git Worktree
1. Organize Your Worktrees
Adopt a folder naming convention. A popular approach:
projects/
├── my-app/               # main worktree (main)
├── my-app--feature-login # feature worktree
├── my-app--hotfix-123    # hotfix worktree
└── my-app--review-pr-45  # code review worktree
The project-name--branch pattern makes it easy to identify each folder at a glance.
2. Use with Multiple IDEs
Open each worktree in a separate VS Code window:
code ../my-app--feature-loginThis is especially powerful for code review: you keep your own work in one window and the PR in another.
3. Automate with Aliases
Add this to your .gitconfig:
[alias]
    wta = worktree add
    wtl = worktree list
    wtr = worktree remove
Now it’s as simple as:
git wta ../my-feature feature/new-screen
git wtl
git wtr ../my-feature
4. Worktree + Local CI/CD
If you run tests or builds locally before pushing, create a dedicated worktree for that:
git worktree add ../build-test main
cd ../build-test
dotnet test  # or npm test, mvn test, etc.
Git Worktree + AI Multi-Agents: The Combo That Will Change Your Workflow
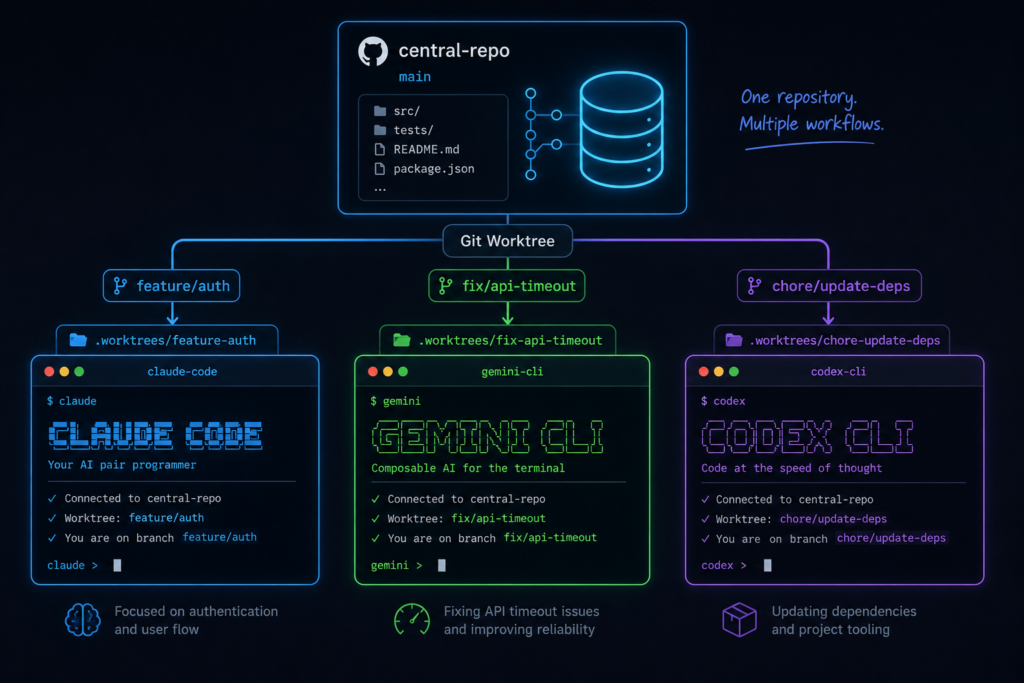
This is where git worktree becomes absurdly powerful. With the explosion of terminal-based AI coding agents, Claude Code, Gemini CLI, and OpenAI Codex CLI, worktree becomes the perfect infrastructure for running multiple AI agents in parallel, each working on a different branch, with zero conflicts.
The Problem: Agents Competing for the Same Directory
When you run an agent like Claude Code or Codex CLI, it reads, edits, and runs commands in the directory where it was invoked. If two agents share the same directory, you get:
- File write conflicts
- One agent overwriting the other’s changes
- Unpredictable results and broken builds
- A dirty repo state that’s impossible to track
Worktree solves this surgically: each agent works in its own directory, on its own branch, while sharing the same Git repository.
Practical Setup: 3 Agents, 3 Worktrees, 1 Repository
Imagine you have a .NET API and want to delegate parallel tasks to each agent:
# 1. Create the working branches
git branch feat/auth-module
git branch feat/api-docs
git branch feat/unit-tests

# 2. Create a worktree for each agent
git worktree add ../api-claude feat/auth-module
git worktree add ../api-gemini feat/api-docs
git worktree add ../api-codex feat/unit-tests
Your structure now looks like this:
projects/
├── my-api/        # main worktree (main) — you work here
├── api-claude/     # Claude Code → feat/auth-module
├── api-gemini/     # Gemini CLI → feat/api-docs
└── api-codex/      # Codex CLI → feat/unit-tests
Running Each Agent in Its Worktree
Open 3 terminals and fire off the agents in parallel:
Terminal 1 – Claude Code:
cd ../api-claude
claude "Implement the JWT authentication module with refresh token.
        Use ASP.NET Core 8 Identity. Create the /login, /refresh, and /logout endpoints."
Terminal 2 – Gemini CLI:
cd ../api-gemini
gemini "Generate complete Swagger/OpenAPI documentation for all existing
        endpoints. Add request/response examples and status codes."
Terminal 3 – OpenAI Codex CLI:
cd ../api-codex
codex "Write unit tests with xUnit and Moq for all the project's
       services. Ensure coverage above 80%."
Each agent works in isolation on its branch, reads and modifies only the files in its worktree, and commits normally. When all are done, you merge the branches into main.
Why Does This Setup Work So Well?
- Zero conflicts – Each agent operates in an isolated directory with its own branch
- Clean history – Each feature has its own commits, easy to review via PR
- Simple rollback – If an agent messed up, just discard the entire branch
- True parallelism – All three agents run at the same time, without waiting on each other
- Easier code review – Each branch generates a separate PR, making review more organized
Table: Comparing the Terminal Agents
| Criteria | Claude Code | Gemini CLI | OpenAI Codex CLI |
|---|---|---|---|
| Installation | npm i -g @anthropic-ai/claude-code | npm i -g @google/gemini-cli | npm i -g @openai/codex |
| Default model | Claude Sonnet/Opus | Gemini 2.5 Pro / Gemini 3 | GPT-5-Codex |
| Context | 200K tokens | 1M tokens | 192K tokens |
| Open source | Yes | Yes (Apache 2.0) | Yes |
| Context file | CLAUDE.md | GEMINI.md | AGENTS.md |
| MCP support | Yes | Yes | Yes |
| Cost | Anthropic API | Generous free tier | Included in ChatGPT Plus/Pro |
| Best for | Refactoring, code review, architecture | Documentation, large codebases, research | Testing, bug fixes, parallel (cloud) tasks |
Pro Tip: Automation Script
Create a script that sets up the worktrees and launches the agents all at once:
#!/bin/bash
# multi-agent-setup.sh

REPO_DIR=$(pwd)
PROJECT_NAME=$(basename "$REPO_DIR")

# Create worktrees
git worktree add "../${PROJECT_NAME}--claude" -b agent/claude-task
git worktree add "../${PROJECT_NAME}--gemini" -b agent/gemini-task
git worktree add "../${PROJECT_NAME}--codex" -b agent/codex-task

echo "Worktrees created:"
git worktree list

echo ""
echo "Now open 3 terminals and run:"
echo "  cd ../${PROJECT_NAME}--claude && claude 'your task here'"
echo "  cd ../${PROJECT_NAME}--gemini && gemini 'your task here'"
echo "  cd ../${PROJECT_NAME}--codex  && codex 'your task here'"
Full Workflow: From Setup to Merge
1. git worktree add (creates worktrees)
            │
2. Each agent works in parallel
   ┌────────┼────────┐
   ▼        ▼        ▼
 Claude   Gemini   Codex
   │        │        │
3. Each one commits to its branch
   │        │        │
4. Push the branches
   │        │        │
5. Open a PR for each branch
   │        │        │
6. Code review (you!)
   │        │        │
7. Merge into main
   └────────┼────────┘
            ▼
8. git worktree remove (cleans everything up)
This workflow turns what would be a full day of work into under an hour. While the agents work, you can review code, grab a coffee, or focus on architecture decisions that require human judgment.
Important Cautions with Multi-Agents
- Always review the generated code – No agent is perfect. Treat each branch like a junior dev’s PR
- Avoid branches that touch the same files – Distribute tasks across different areas of the codebase to minimize merge conflicts
- Use context files –
CLAUDE.md,GEMINI.md, andAGENTS.mdare essential for giving the agent context about the project’s architecture and conventions - Set clear boundaries – Each agent should have a well-defined scope. “Do everything” doesn’t work well
Conclusion: Git Worktree Is the Upgrade You Didn’t Know You Needed
Let’s recap the key takeaways:
- Git worktree lets you work on multiple branches simultaneously, each in its own directory
- It’s native to Git, no extra install needed (Git 2.5+)
- It shares the .git of the original repository – much lighter and faster than cloning
- It eliminates the need for panicked
git stashand dirty commits - Combined with AI agents (Claude Code, Gemini CLI, Codex CLI), it enables true parallelism of development tasks
- The multi-agent worktree workflow can turn hours of work into minutes
If you’re a developer and still don’t use git worktree, you’re literally leaving productivity on the table. And if you combine it with terminal-based AI agents, the gains are exponential.
Start with a simple worktree today. Then evolve to the multi-agent setup. Your future self will thank you.
Reference Links
- Official Git Worktree Documentation – Complete reference of commands and options
- Gemini CLI — GitHub — Official repository for Google’s terminal agent
- OpenAI Codex CLI — Docs — Official documentation for OpenAI’s terminal agent