

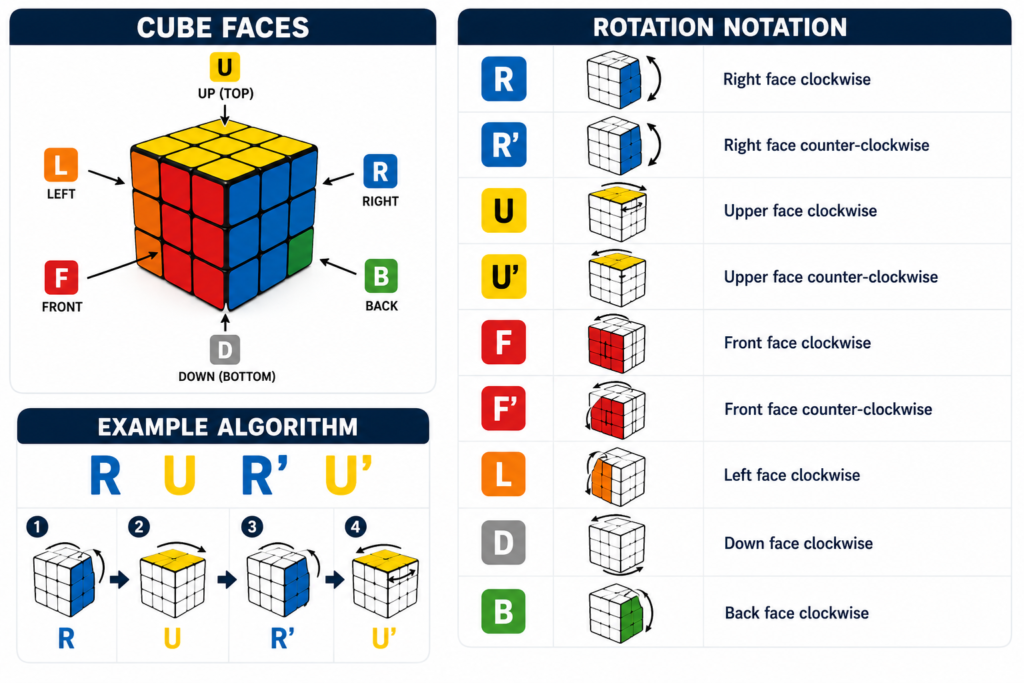
Solving a Rubik’s Cube comes down to following 8 repeatable steps: form the white cross, complete the white face, solve the middle layer, build the yellow cross, orient the yellow face, position the corners, and finish the edges. Each step uses simple algorithms, no memorization genius required.
Wait – You’ve Been Thinking About This All Wrong
You’ve probably stared at a scrambled Rubik’s Cube and thought: “There’s no way a normal person figures this out.”
And honestly? You’re not completely wrong.
Randomly turning faces hoping to solve it is nearly impossible, the cube has over 43 quintillion possible combinations, with only one correct solution. But here’s the thing nobody tells you: solving a Rubik’s Cube is not about being smart. It’s about following a recipe.
Once you understand that, everything changes.
In this guide, you’ll learn how to solve a Rubik’s Cube from scratch using the beginner’s layer-by-layer method, the same approach used by millions of people to crack this puzzle for the first time. No shortcuts, no nonsense. Just a clear, step-by-step walkthrough.
Before You Start: What You Actually Need to Know
Before touching a single face, get these fundamentals locked in.
Understanding the Pieces
A 3×3 Rubik’s Cube has three types of pieces:
- Centers (6 total): Fixed in place. They never move relative to each other. The color of the center defines what color that face needs to be.
- Edges (12 total): Two-colored pieces located between centers.
- Corners (8 total): Three-colored pieces at each corner of the cube.
Reading Move Notation
Algorithms use letter notation to describe moves:
| Notation | Meaning |
|---|---|
| R | Right face clockwise |
| R’ | Right face counter-clockwise |
| U | Upper face clockwise |
| U’ | Upper face counter-clockwise |
| F | Front face clockwise |
| F’ | Front face counter-clockwise |
| L | Left face clockwise |
| D | Down face clockwise |
| B | Back face clockwise |
The apostrophe (') always means counter-clockwise. That’s it. Once you know this, you can read any algorithm.
The Golden Rule
Analyze before you move. Especially as a beginner, take time to look at the cube before executing any turn. Panic-turning is how people get stuck.
The 8-Step Method to Solve a Rubik’s Cube
Step 1 – Build the White Cross
Goal: Place the 4 white edge pieces around the white center, forming a cross on the top face.
This is the most intuitive step. There are no algorithms, just logical thinking. Move the white edges to surround the white center on the top layer.
Pro tip: Make sure the side color of each white edge also matches its adjacent center. For example, if the white-green edge is in the cross, the green side of that piece should face the green center.
Step 2 – Complete the White Cross (Align the Edges)
Goal: Bring the white cross to the bottom and align each edge with its matching center on the sides.
This step is the simplest of all eight. Flip the cube so white faces down, then rotate the top layer until each white edge piece aligns with its matching side center, then bring it down.
Step 3 – Finish the First Layer (White Corners)
Goal: Insert the 4 white corner pieces to complete the entire white face.
Now you need to solve the 4 white corners. Each corner belongs in a specific spot, find it on the top layer and use this trigger move to insert it:
Algorithm: R U R' U'
Repeat this move until the corner drops into its correct position. You may need to apply it 1–5 times depending on the corner’s orientation.
Step 4 – Solve the Middle Layer
Goal: Place the 4 middle-layer edge pieces to complete the first two layers (F2L).
From here, things get more systematic. Look for edge pieces on the top layer that don’t have yellow on them. Depending on which direction they need to go, use one of these algorithms:
Insert Right:U R U' R' U' F' U F
Insert Left:U' L' U L U F U' F'
This step has the most variations, but the logic is the same every time. Find the edge, orient it correctly, then slot it in.
Step 5 – Build the Yellow Cross
Goal: Form a cross on the yellow (top) face.
Flip the cube so yellow is on top. You’ll see one of three patterns on the yellow face:
- A dot (no yellow edges oriented)
- An L-shape (two adjacent yellow edges)
- A line (two opposite yellow edges)
Algorithm: F R U R' U' F'
Apply it until you get a yellow cross. You may need to repeat 1-3 times depending on your starting pattern.
Step 6 – Orient the Yellow Face
Goal: Make all yellow stickers face up, completing the yellow face.
You’ll now have a yellow cross but some corners may not be yellow-side-up. Use this algorithm to flip them:
Algorithm: R U R' U R U U R'
Position the cube so an unsolved corner is at the front-right, apply the algorithm, and check again. Do not rotate the whole cube during this step, only turn the top layer (U) to bring the next unsolved corner into position.
Step 7 – Position the Yellow Corners
Goal: Move the yellow corners to their correct positions (even if the colors on the sides aren’t aligned yet).
Look for a corner that’s already in the right spot (even if rotated wrong). Position it at the back-right and apply:
Algorithm: U R U' L' U R' U' L
Repeat until all 4 corners are in the right spots.
Step 8 – Solve the Final Edges
Goal: Cycle the last 4 edge pieces into their correct positions. This is the final step.
Two possible scenarios exist here, edges cycling clockwise or counter-clockwise. Use the matching algorithm:
Clockwise cycle: R U' R U R U R U' R' U' R R
Counter-clockwise cycle: R R U R U R' U' R' U' R' U R'
Apply the correct one and your Rubik’s Cube will be solved.
Common Mistakes Beginners Make (And How to Avoid Them)
- Rotating the whole cube mid-algorithm: Only move the faces specified in the notation. Turning your whole cube by mistake resets your frame of reference.
- Losing track of the front face: Before any algorithm, clearly define which face is “front.” Put a sticker or mark it mentally.
- Skipping step 7 and going straight to step 8: The last two steps must be done in order. Always position the corners before cycling the edges.
- “Impossible cases”: If you disassembled and reassembled your cube incorrectly, pieces may be physically impossible to solve with algorithms. Check for this if you’re stuck after step 5 or later.
How Long Does It Take to Learn?
For most beginners, here’s a realistic timeline:
- First solve: 30-60 minutes (following the guide step by step)
- Consistent solves from memory: 1-2 weeks of practice
- Sub-3-minute solves: 3-4 weeks with daily practice
- Sub-1-minute: Requires learning more advanced techniques like F2L and OLL/PLL
The beginner method described here can realistically get you to solves in the 1-3 minute range with enough practice.
Want to Go Faster? Here’s the Developer Mindset Trick
If you’re a developer, you already know this: efficiency comes from pattern recognition and algorithm optimization.
Speedcubers use the same logic. They learn more algorithms to reduce the number of moves, the same way you’d refactor code to reduce complexity. Once you’re comfortable with the basic method, the next level is:
- CFOP method – the most popular speedcubing framework
- F2L (First Two Layers) – solving layers 1 and 2 simultaneously
- OLL/PLL – 57 + 21 algorithm sets to finish the last layer in just 2 steps
Think of the beginner method as your MVP. CFOP is the production-ready version.
Key Takeaways
- The Rubik’s Cube has 43 quintillion combinations but only one solution – random solving doesn’t work
- The beginner layer-by-layer method uses 8 structured steps and a handful of simple algorithms
- Step 0 is reading notation, once you know
R,R',U,U', you can follow any algorithm - The hardest part isn’t the algorithms, it’s staying calm and analyzing before you move
- With daily practice, most people can solve consistently from memory within 1-2 weeks
References
- CuboVelocidade — Método Básico 3x3x3 – The most complete beginner tutorial in Portuguese, with video walkthroughs for each step.
- Ruwix — How to Solve the Rubik’s Cube – Detailed beginner guide with interactive 3D cube diagrams and step-by-step notation.
- Speedsolving Wiki — CFOP Method – In-depth reference for advancing beyond the beginner method into competitive speedcubing techniques.
Written for developers and tech enthusiasts who think in systems, patterns, and algorithms. If you can debug code, you can solve a Rubik’s Cube.