Have you ever needed to test a UI with a different API response, change some text on the screen without modifying the source code, or simulate specific behavior?
If so, the Chrome DevTools’ Overrides feature might become your new best friend.
In this post, I will show you how to use Overrides to edit local application files and even modify API responses — all directly in the browser, without touching the server or the code repository.
What is the Overrides feature?
Overrides is a Chrome feature that lets you locally override files loaded by a website. This includes JS scripts, HTML, CSS, and even the content of API responses.
These modifications only affect your local machine and last as long as you want. It is a great way to run quick tests without changing the original code or deploying new versions.
Enabling Overrides in Chrome
Step-by-step guide:
- Open DevTools (F12 or
Ctrl + Shift + I) - Go to the Sources tab
- In the left panel, click the Overrides tab
- Chrome will ask you to select a local folder on your computer to save the overridden files
- Chose an empty folder (e.g.,
C:\devtools-overrides) - Allow access (a pop-up will apper asking for permission)
Done! Now you can start editing any file the page loads — and the browser will use your version instead of the original.
Watch this quick demo:
Here’s how I use Chrome Overrides to change layout and fake API data in seconds:
Example 1 – Editing CSS files
- Open any website
- Go to the Sources tab and find the loaded CSS file (e.g.,
/styles.css) - Double-click the file to open it
- Edit the content directly, for example:
body {
  background-color: black !important;
  color: lime;
}- Save with
Ctrl + S - Reload the page
You’ll see the new appearance applied as if it were part of the original code.
Example 2 – Changing text or logic in JS files
The same goes for JavaScript files.
- Find a
.jsfile loaded by the site - Edit any part of the file (it could be hardcoded text, a condition, etc.)
- Save and reload
This is great for testing hypotheses, simulationg error states, or seeing how the frontend behaves with certain logic changes.
Example 3 – Overriding an API response
This is the coolest part — and not many people know about it.
You can modify the response of a request (e.g., a JSON from the API), and the browser will display your version as if it were real.
How to do it:
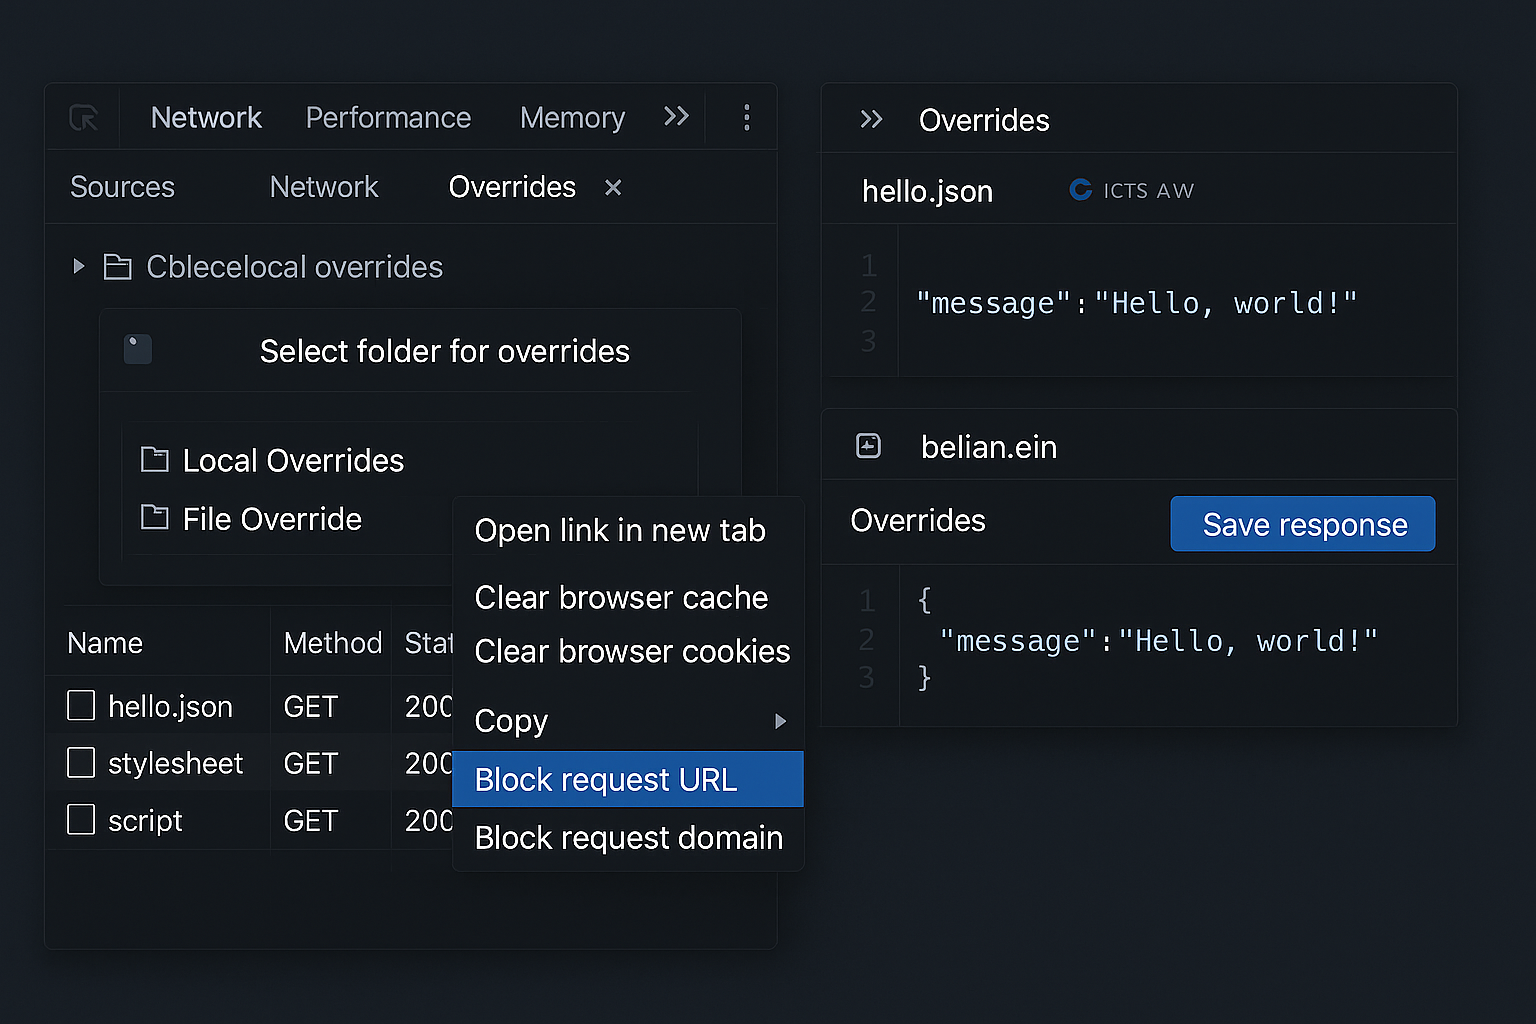
- Go to the Network tab
- Filter by
XHRorFetch - Right-click the request you want to override and select:
Save response - Chrome will save a copy of the response inside your Overrides folder.
- Go to the Sources tab → Overrides
- Find the saved file (named by a hash or encoded URL)
- Edit the JSON or returned content:
[
  {
    "id": 1,
    "name": "Fake User",
    "status": "test"
  }
]- Save (
Ctrl + S) and reload the page
Now, the interface will load your modified response as if it came from the original API.
Practical Applications
- Test UI states: how the frontend behaves with empty lists, errors, or imcomplete data.
- Simulate different users without changing the backend.
- Simulate specific errors like
500 Internal Server Erroror403 Forbidden(advanced edits). - Remove or force data: test broken layouts, infinite loading, etc.
- Test frontend code without needing the backend to be up.
Advantages of Using Overrides
Limitations
Bonus Tip: Save Time with Snippets
If you use Overrides often, you can create JS snippets in the Sources → Snippets tab to speed up repetitive tasks:
// Simulate 500 error
fetch = () => Promise.reject({ status: 500, message: "Simulated error" });
Or simulate a delay:
setTimeout(() => alert("Simulating loading..."), 3000);Conclusion
The Overrides feature in Chrome DevTools is one of the most powerfull — and most underused — tools for web developers. It gives you the freedom to test, debug, and experiment without the fear of breaking anything.
If you haven’t used this feature yet, I highly recommend adding it to your frontend testing, layout validation, and API behavior debugging.
You’ll be surprised by how much faster it makes your development workflow!